BrainFrame Psychology for Kids: Activities
EMOTION-BOTS MAGNET CRAFT

This is a fun and interactive craft that helps children explore their emotions by choosing the emotion of their robot! This twist of the simple paper craft version is a great way for kids to have fun exploring their emotions everyday.
By attaching magnets to the different emotion-bot faces, children can switch out the expression of there emotion-bot to reflect their own emotions. This craft is a great way for children and families to incorporate regular mood check-ins into their daily routines! This is a fun craft to go along with other emtoion-coping resources like these emotion wheels.
Materials:
- printer,
- paper,
- scissors,
- gluestick,
- hot glue,
- magnets,
- cardboard (cereal boxes work great),
- OPTIONAL: coloring supplies (crayons, pencils, paint),
- Magnetic Printer Paper
Instructions:
- Print out your templates of choice.
- You will need to print off a robot template and the faces templates.
- There are three different robots to choose from.
- If you chose a black & white template, color in the emotion-bots.
- OPTIONAL: If you want the emotion-bot to be more solid and last longer, glue the template onto a piece of cardboard.
 Cut out the robot body template pieces. Children may need adult supervision or assistance for this part.
 Glue the template pieces of the robot body together:
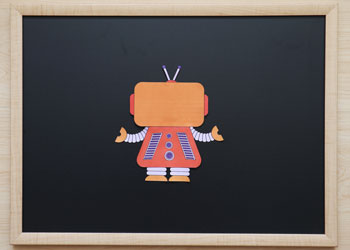
- EMOTION-BOT 1 (the left robot in the photo):
- Glue the antennas on top of the head and the ears on either side of the head.
- Glue the rectangle head on top of the body.
- Glue the purple vents and bottons onto the body.
- Glue the arms onto either side of the body.
- Glue the feet onto the bottom of the body.
- EMOTION-BOT 2 (the center robot in the photo):
- Glue the two antennas on top of the head.
- Glue the oval head on top of the body.
- Glue the purple doors onto the body.
- Glue the arms onto either side of the body.
- Glue the feet onto the bottom of the body.
- EMOTION-BOT 3 (the right robot in the photo):
- Glue the antenna on top of the head.
- Glue the head on top of the body.
- Glue the purple monitor screen onto the body.
- Glue the purple base to the bottom of the body.
- Glue a wheel to the bottom of each stem of the purple base.
- EMOTION-BOT 1 (the left robot in the photo):
 Attach the robot body to a magnetic surface (fridge, whiteboard, chalkboard), I used some small pieces of tape.
  Glue the faces templates onto cardboard and cut out the different robot faces.
- For this craft, it is great to cut out all of the different facial expressions so that children have lots of emotions to chose from. But if you are limited with space you can choose some of the more basic emotions (like happy, sad, angry).
 Use a hot glue gun to attach a magnet to the back of each robot face (adults should assist or supervise for this part).
- OPTIONAL: Instead of the last two steps, you can print the faces templates out on Magnetic Printer Paper.
- It may be helpful to write the emotion onto the back of each face with a sharpie or marker. The emotions of each face are labelled on the templates.
 Place all of the robot faces out around the emotion-bot.
 Now your activity is all ready to go! Create a routine of chosing your robot's emotion and placing that facial expression on your emotion-bot.
- The magnetic faces make it really easy to switch facial expressions, so children can change the expression whenever they want! Some kids may choose to pick an emotion at the end of every day or change the facial expression whenever they feel a change in their own emotions.
- Try using these emotion wheels to help children learn how to listen to their emotions and understand what they are feeling.
Templates:
- The following links will take you to the template page. Follow the instructions to print your template of choice and then press the back button to return to this page.
Emotion-bot 1 (color) or (B&W)
Emotion-bot 2 (color) or (B&W)
Emotion-bot 3 (color) or (B&W)
Emotion-bot Faces 1 (color) or (B&W)
Emotion-bot Faces 2 (color) or (B&W)